ZPacks Duplex Initial Setup
Disclaimer: This post is NOT sponsored. All the gear mentioned in this post was purchased by me at retail prices. I have no affiliations with any of the companies or brands mentioned.
Introduction
When it comes to the great outdoors, there are many ways to enjoy it. And so many options for gear, it will boggle the mind. Most people are probably familiar with car camping where you drive right up to the campsite and setup the tent that was purchased at some sporting goods sport or the outdoor section of the local mega-mart. Backpacking, where you carry all of your gear in a pack on your back, and hike to the campsite, presents it's own challenges and requires lighter gear. The general advice is to focus on the Big 3 first as these will have the biggest impact on your pack weight. For this post, I will be focusing on the shelter I am going to be using for my upcoming Appalachian Trail thru-hike.
One of the challenges of backpacking is the trade off between a lighter pack, which makes hiking better, or more comfort at camping which usually requires more and heavier gear. One solution to this is to get lighter gear, so you can carry more items to make camping more comfortable without adding extra weight. Pack weight is such a concern that there are several websites devoted to listing your gear with their weights to figure out your pack weight. Usually, these sites offer some sharing feature so that you can share a link to your gear list for others to review and provide advice on the best way to reduce your weight, called a shakedown. A popular one is lighterpack.com. You can see mine by looking at the Gear Lists in the menu.
Big 3 vs Big 4
You may see the Big 3 or the Big 4 mentioned in various places. This referrers to your shelter, your sleep system, which may be considered 1 or separated into 2 as your sleeping bag/quilt and your sleeping pad, and your pack. Personally, I like to use 3 instead of 4 as thinking of them as categories makes more sense. Tents are made up of various parts, and the other options for shelters like hammocks are usually sold as separate parts too. it just makes sense to consider the different parts of your sleep system as one as well.
Shelters
The shelter can take many forms. A tent is the most common, but tarps and hammocks are also commonly seen. Even in tents, there are a wide variation of tents. Most people are likely familiar with the kind that you can get at sporting goods stores or mega-marts. These tend to be larger and heavier versions of the double-walled semi-freestanding style. Double-walled is when a tent comes with two walls. Usually a mesh wall on the tent itself and a rainfly that goes over the tent. A semi-freestanding tent will keep its shape and stand up just from the included poles. This style of tent is perfectly fine and is great for car camping with the entire family, but usually these can be too large and heavy for backpacking. You can find lighter, smaller versions in this style designed for backpacking and those can be wonderful. I have a MSR Hubba NX 1 in my gear collection which works great. The tent altogether weights 1250 g (2 lb 12 oz) for a 1-person tent.
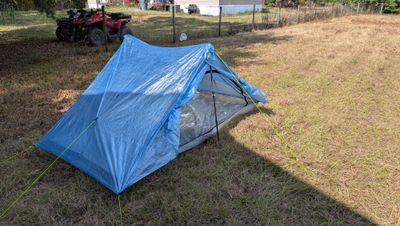
For my upcoming thru-hike on the Appalachian Trail, I wanted to find something lighter to help reduce my pack weight. As I will be carrying this gear for about 2200 miles (3540 km), weight reduction is important. After a lot of online searching, reading reviews, reading suggestions from others who have hike this trail, and seeing what tents were popular and why, I settled on the ZPacks Duplex. Unlike the NX 1, the Duplex is a single-walled, trekking pole, 2-person tent and only weights 554g (1lb 3.4 oz).
As it is a single-walled tent, instead of having two separate layers of material, the tend is designed with a single layer. This reduction in layers helps reduce weight because you are not carrying all that extra fabric. It also simplifies the setup since you don't have to setup a body and then the rainfly on top. It all gets setup together. One downside of this style of design is these tents are said to be more prone to condensation that a double-walled tent.
A trekking pole tent uses your trekking poles for the structure instead of having dedicated poles. Reusing something you are already carrying for more than one purpose is a great way to reduce weight. The trade off here is that this tent requires being staked out to stand and won't stand on its own like a semi-freestanding tent would.
Initial Reactions
As with all new tents, I followed the general advice and set it up for the first time in my own back yard to learn how to best set it up. You don't want to be 10 miles down the trail, weary from the hike and weight of the gear with night falling trying to figure out how to setup the new tent. I used my pair of Leki Spirit Light trekking poles (256g each), 4 MSR Groundhog (14g each) stakes, and 4 MSR Groundhog Mini (9g each) stakes.
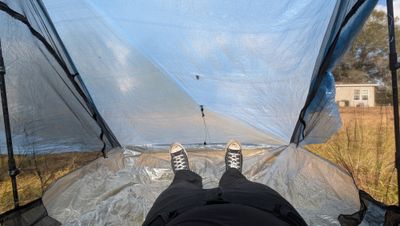
While I haven't slept in the tent yet, I did crawl in and lay down inside to get a sense of what it would be like. My initial thoughts on this tent are that I need more stakes. While the 8 stakes I used helped the tent up well, I discovered that I need a couple more for staking out the doors. I am debating between either a couple more Minis for this, or maybe a couple shepherd hooks since they might hold the loops at the bottom of the doors better. After I crawled inside, I was impressed with the amount of room for such a light tent. As a 6 ft (1.83 m) tall person, I have had issues in other tents where I couldn't full stretch out without touching the sides of the tent. I figured I would solve this issue by sleeping diagonally in the tent since it will just be me in a 2-person tent. But with my initial lie down in the tent, I don't know if that will actually be needed. Overall, my initial thoughts on this tent is that this was a great purchase even with the $700 price tag.